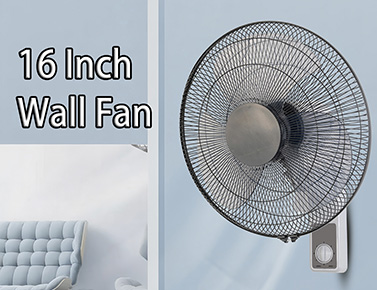
Overcoming the heat of summer only requires a wall mounted fan ! The installation of wall fans only requires a little bit of hands-on courage and appropriate tools. Not only can you save on labor service costs, but you can also feel satisfied with successful installation. So, pick up your tools and follow this guide to bring coolness and comfort to your home with a brand new wall fan.
Preparation content:
New wall fans: Windeel offers a variety of wall fans to meet your needs.
Drill bit with suitable drill bit: The size of the drill bit depends on the size of the mounting bracket hole for the wall fan. For detailed information, please refer to the manufacturer's instructions.
Screwdriver: Cross head screwdriver is the most common, but please carefully check the instructions of the fan to ensure accuracy.
Pencil: Mark the drilling points of the bracket for accurate placement.
Safety goggles: protect the eyes from dust and debris during drilling.
Placement is the key to achieving optimal airflow and safety. Consider the following factors:
Airflow: Place the fan in a well ventilated central position throughout the room.
Operability: Ensure that the fan control suspension rope is accessible to most people in the household during installation.
Power socket: located near the power socket to save wiring expenses.
Safety: Avoid placing the fan directly above furniture or in areas where children can come into contact. Maintain a safe distance from other electrical appliances.
Installation:
After selecting the tools and location, you can proceed with the installation! The following is a general guide, but please be sure to refer to the specific instructions provided by Windeel wall fans:
Turn off the power: safety first! Find the main power switch that controls the installation of the fan room and turn it off.
Mark drilling points: Place the installation bracket of the fan against the wall, ensuring it is horizontal and vertical, and then mark the drilling points. This way, the fan installation will not tilt.
Drilling guide holes (optional): For certain wall materials, pre drilling guide holes can help prevent cracks and ensure easier insertion of screws. You can choose the corresponding drill bit to drill holes according to the wall material.
Installation bracket: Use appropriate screws and screwdrivers to secure the bracket to the wall.
Connect the fan to the bracket: According to the manufacturer's instructions, use screws to connect the fan unit to the installed bracket.
Electrical connection: Before inserting into a nearby socket, please carefully check the connection and ensure that the room power is still turned off.
Everything is installed and connected, it's time to test your manual skills!
Turn on the power: Turn on the fan switch and try your new wall mounted fan.
Test operation: Ensure that the fan operates normally at all gear speed settings, and that the fan blades and motor functions properly.
Adjust the tilt angle (optional): Adjust the fan head to obtain airflow at a specific location in the room.